Download: WSTrust_DataSync_Integration_en.pdf
Date: 1/7/2012
Version: 1.0
Tags: Documentation
 Here you have to enter IP address or URL or your WSTrust server together with the port (8485 is a default port). Check box Enable WSTrust SSO integration must be checked, otherwise integration is not active. New setting has to be confirmed/stored by clicking on Save WSTrust Settings button. Integration is now ready to use.
How to install WSTrust Integration to Novell Data Synchronizer Mobility Pack
System requirements
You must have installed and running- WSTrust server part
- Novell Data Synchronizer 1.2
Installation
There is a comfortable installation script available for installation on Linux platform. You must assign “run” permissions to the installation script file inst_wstrust_datasync_1.0.bin (e.g., chmod + x inst_wstrust_datasync_1.0.bin) and run it (./inst_wstrust_datasync_1.0.bin). Script must be run on the server where the Data Synchronizer is installed. Installation script instructions:- Enter or confirm the path to the folder of Data Synchronizer (default path is /opt/novell/datasync).
Configuration
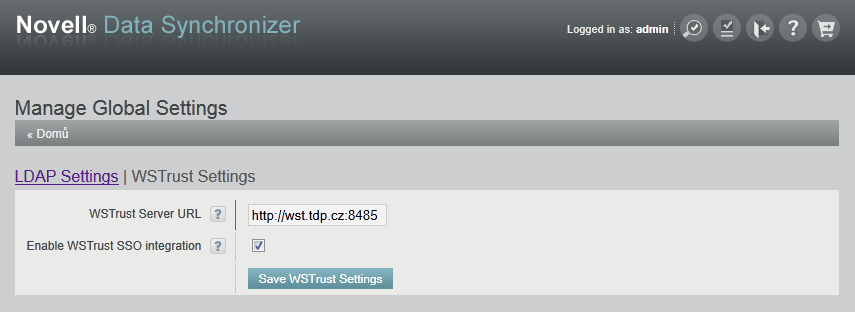
Integration is not configured after the installation, so, you must authenticate to the web interface of Novell Data Synchronizer with administrator rights. Simply use built-in admin user. Go to the Manage Global Settings section where is WSTrust setting page added – see picture below.
Here you have to enter IP address or URL or your WSTrust server together with the port (8485 is a default port). Check box Enable WSTrust SSO integration must be checked, otherwise integration is not active. New setting has to be confirmed/stored by clicking on Save WSTrust Settings button. Integration is now ready to use.
Note – Novell Data Synchronizer and WSTrust server must use same directory (with eDir, you can use different instances of a LDAP server but both have to use same directory tree)